Assume you have a Windows Form GUI application (named ExportDataToOfficeApp), whose main Form defines a DataGridView named dataGridCars. This same form has two Button controls, one of which will bring up a dialog box to insert a new row of data to the grid, and the other of which needs to export the grid’s data to an Excel spreadsheet. Given the fact that the Excel application exposes a programming model via COM, you can hook into this object model using the interoperability layer. Figure 18-9 shows the completed GUI.
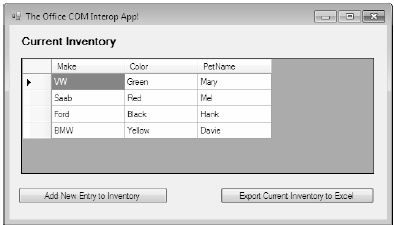
Figure 18-9 The GUI of the COM interop example
You will fill the grid with some initial data by handling the form’s Load event as so (the Car class used as the type parameter for the generic List<T> is a simple class in the project with Color, Make, and PetName properties):
public partial class MainForm : Form
{
    List<Car> carsInStock = null;

    public MainForm()
    {
        InitializeComponent();
    }

    private void MainForm_Load(object sender, EventArgs e)
    {
        carsInStock = new List<Car>
        {
            new Car {Color="Green", Make="VW", PetName="Mary"},
            new Car {Color="Red", Make="Saab", PetName="Mel"},
            new Car {Color="Black", Make="Ford", PetName="Hank"},
            new Car {Color="Yellow", Make="BMW", PetName="Davie"}
        };
        UpdateGrid();
    }

    private void UpdateGrid()
    {
        // Reset the source of data.
        dataGridCars.DataSource = null;
        dataGridCars.DataSource = carsInStock;
    }
}
The Click event for the “Add” button will launch a custom dialog box to allow the user to enter new data for a Car object, and if they click the OK button, the data is added to the grid. I won’t bother to show the code behind the dialog box, so please see the provided solution for details. If you are following however, include the NewCarDialog.cs, NewCarDialog.designer.cs and NewCarDialog.resx files into your project (all of which are part of the code download for this text). Once you have done so, implement the “Add” button click hander as so:
private void btnAddNewCar_Click(object sender, EventArgs e)
{
    NewCarDialog d = new NewCarDialog();
    if (d.ShowDialog() == DialogResult.OK)
    {
        // Add new car to list.
        carsInStock.Add(d.theCar);
        UpdateGrid();
    }
}
The Click event handler for the , “Export” button is the heart of this example. Using the .NET tab of the Add Reference… dialog box, add a reference to the Microsoft.Office.Interop.Excel.dll primary interop assembly (as shown previously in Figure 18-7). Add the following namespace alias to the form’s primary code file. Be aware that this is not mandatory to define an alias when interacting with COM libraries. However, by doing so, you have a handy qualifier for all of the imported COM objects, which is very handy if some of these COM objects have names which would clash with your .NET types:
// Create an alias to the Excel object model.
using Excel = Microsoft.Office.Interop.Excel;
Implement this button Click event hander to call a private helper function named ExportToExcel():
private void btnExportToExcel_Click(object sender, EventArgs e)
{
    ExportToExcel(carsInStock);
}
Because you imported the COM library using Visual Studio 2010, the PIA has been automatically configured so that the used metadata will be embedded into the .NET application (recall the role of the Embed Interop Types property). Therefore, all COM Variants are realized as dynamic data types. Furthermore, because you are compiling your code with C# 4.0, you can make use of optional arguments and named arguments. This being said consider the following implementation of ExportToExcel():
static void ExportToExcel(List<Car> carsInStock)
{
    // Load up Excel, then make a new empty workbook.
    Excel.Application excelApp = new Excel.Application();
    excelApp.Workbooks.Add();

    // This example uses a single workSheet.
    Excel._Worksheet workSheet = excelApp.ActiveSheet;

    // Establish column headings in cells.
    workSheet.Cells[1, "A"] = "Make";
    workSheet.Cells[1, "B"] = "Color";
    workSheet.Cells[1, "C"] = "Pet Name";

    // Now, map all data in List<Car> to the cells of the spread sheet.
    int row = 1;
    foreach (Car c in carsInStock)
    {
        row++;
        workSheet.Cells[row, "A"] = c.Make;
        workSheet.Cells[row, "B"] = c.Color;
        workSheet.Cells[row, "C"] = c.PetName;
    }

    // Give our table data a nice look and feel.
    workSheet.Range["A1"].AutoFormat(
        Excel.XlRangeAutoFormat.xlRangeAutoFormatClassic2);

    // Save the file, quit Excel and display message to user.
    workSheet.SaveAs(string.Format(@"{0}\Inventory.xlsx", Environment.CurrentDirectory));
    excelApp.Quit();
    MessageBox.Show("The Inventory.xslx file has been saved to your app folder",
        "Export complete!");
}
This method begins by loading Excel into memory, however you won’t see it visible on your computer desktop. For this application, you are only interested in using the internal Excel object model. However, if you do want to actually display the UI of Excel, update your method with this additional line of code:
static void ExportToExcel(List<Car> carsInStock)
{
    // Load up Excel, then make a new empty workbook.
    Excel.Application excelApp = new Excel.Application();

    // Go ahead and make Excel visible on the computer.
    excelApp.Visible = true;
...
}
Once you create an empty worksheet, you add three columns which are named similar to the properties of the Car class. After this point, you fill the cells with the data of the List<Car>, and save your file under the (hard coded) name Inventory.xlsx.
At this point if you run your application, add a few new records, and export your data to Excel, you will then be able to open up the Inventory.xlsx file, which will be saved to the \bin\Debug folder of your Windows Forms application. Figure 18-10 shows a possible export.
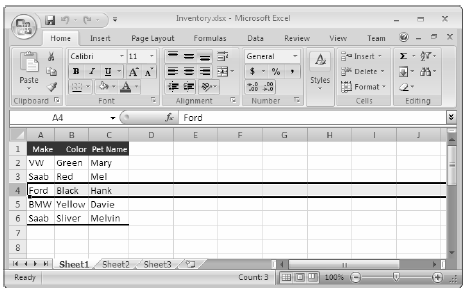
Figure 18-10 Exporting your data to an Excel file
Now, if you were to select the Microsoft.Office.Interop.Excel.dll assembly (in Solution Explorer), and set its Embed Interop Type property to False, you would have new compiler errors, as the COM Variant data is no longer realized as dynamic data, but as System.Object variables. This will require you to update ExportToExcel() with a number of casting operations. As well, if this project were compiled under Visual Studio 2008, you no longer have the benefit of optional/named parameters, and must explicitly marked all missing arguments. Here is a version of the ExportToExcel() method which would be required in earlier versions of C#:
static void ExportToExcel2008(List<Car> carsInStock)
{
    Excel.Application excelApp = new Excel.Application();

    // Must mark missing params!
    excelApp.Workbooks.Add(Type.Missing);

    // Must cast Object as _Worksheet!
    Excel._Worksheet workSheet = (Excel._Worksheet)excelApp.ActiveSheet;

    // Must cast each Object as Range object then call
    // call low level Value2 property!
    ((Excel.Range)excelApp.Cells[1, "A"]).Value2 = "Make";
    ((Excel.Range)excelApp.Cells[1, "B"]).Value2 = "Color";
    ((Excel.Range)excelApp.Cells[1, "C"]).Value2 = "Pet Name";

    int row = 1;
    foreach (Car c in carsInStock)
    {
        row++;
        // Must cast each Object as Range and call low level Value2 prop!
        ((Excel.Range)workSheet.Cells[row, "A"]).Value2 = c.Make;
        ((Excel.Range)workSheet.Cells[row, "B"]).Value2 = c.Color;
        ((Excel.Range)workSheet.Cells[row, "C"]).Value2 = c.PetName;
    }

    // Must call get_Range method and then specify all missing args!.
    excelApp.get_Range("A1", Type.Missing).AutoFormat(
        Excel.XlRangeAutoFormat.xlRangeAutoFormatClassic2,
        Type.Missing, Type.Missing, Type.Missing,
        Type.Missing, Type.Missing, Type.Missing);

    // Must specify all missing optional args!
    workSheet.SaveAs(string.Format(@"{0}\Inventory.xlsx", Environment.CurrentDirectory),
        Type.Missing, Type.Missing, Type.Missing, Type.Missing, Type.Missing, Type.Missing,
        Type.Missing, Type.Missing, Type.Missing);

    excelApp.Quit();
    MessageBox.Show("The Inventory.xslx file has been saved to your app folder",
        "Export complete!");
}
While the end result is identical, as I am sure you agree, this version of the method is much more verbose. As well, since earlier versions of C# (prior to .NET 4.0, to be specific) don’t allow you to embedd the COM interop data, you would find that your output directory now contains local copies of a number of interop assemblies, which you would be required to ship to the end user’s machine (Figure 18-11).
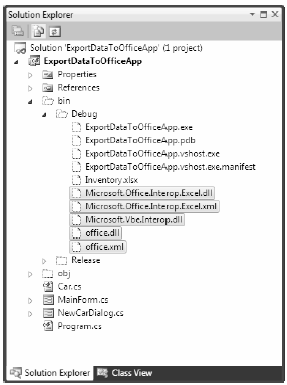
Figure 18-11. Not embedding interop data requires you to ship standalone interoperability assemblies That wraps up our look at the C# dynamic keyword and the DLR. Hopefully you can see how these new .NET 4.0 features can simplify complex programming tasks, and (perhaps more importantly) understand the trade offs. When you opt into dynamic data, you do lose a good amount of type safety, and your code base is prone to many more runtime errors.
Source Code The ExportDataToOfficeApp project is included under the Chapter 18 subdirectory.